
Now that the initial and most important tool of all the lateral work is installed – leg-yield – it’s time to move on to the next step in Part 2 of my guidelines on training the lateral work.
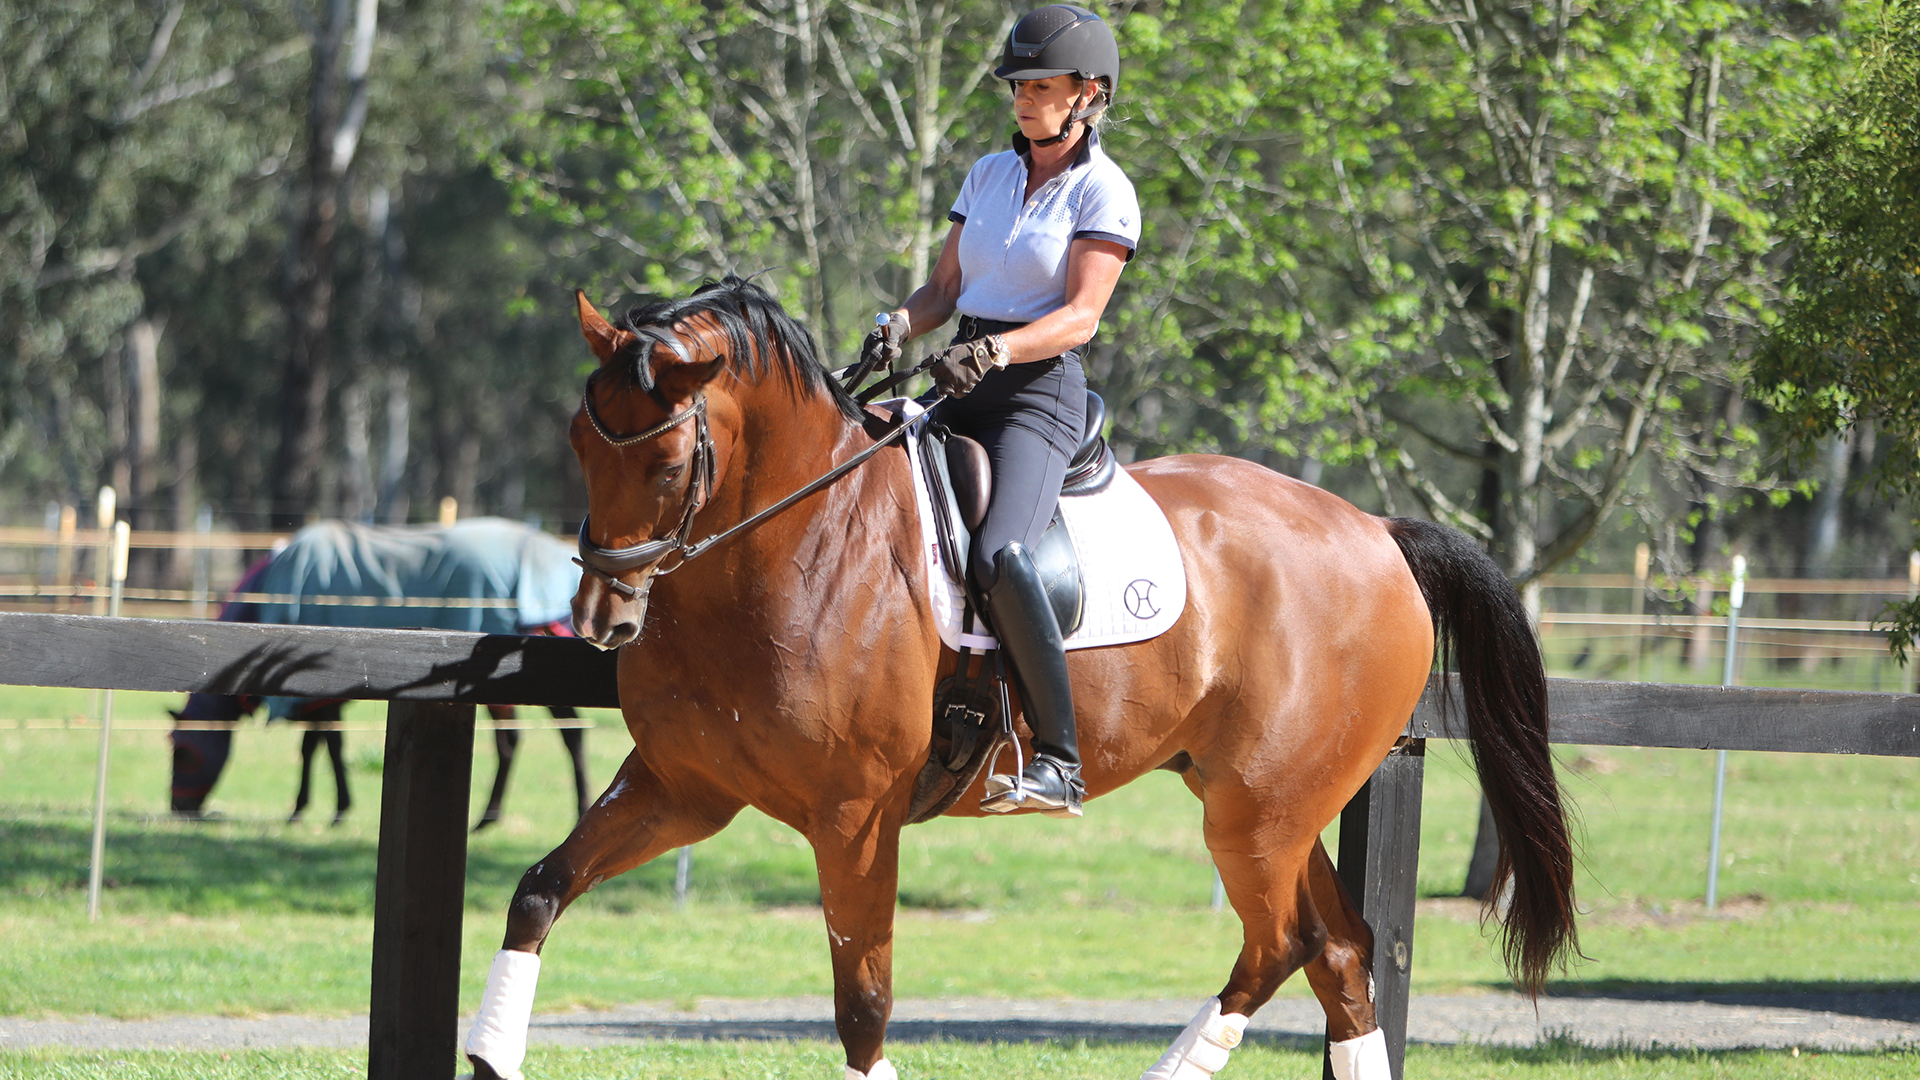
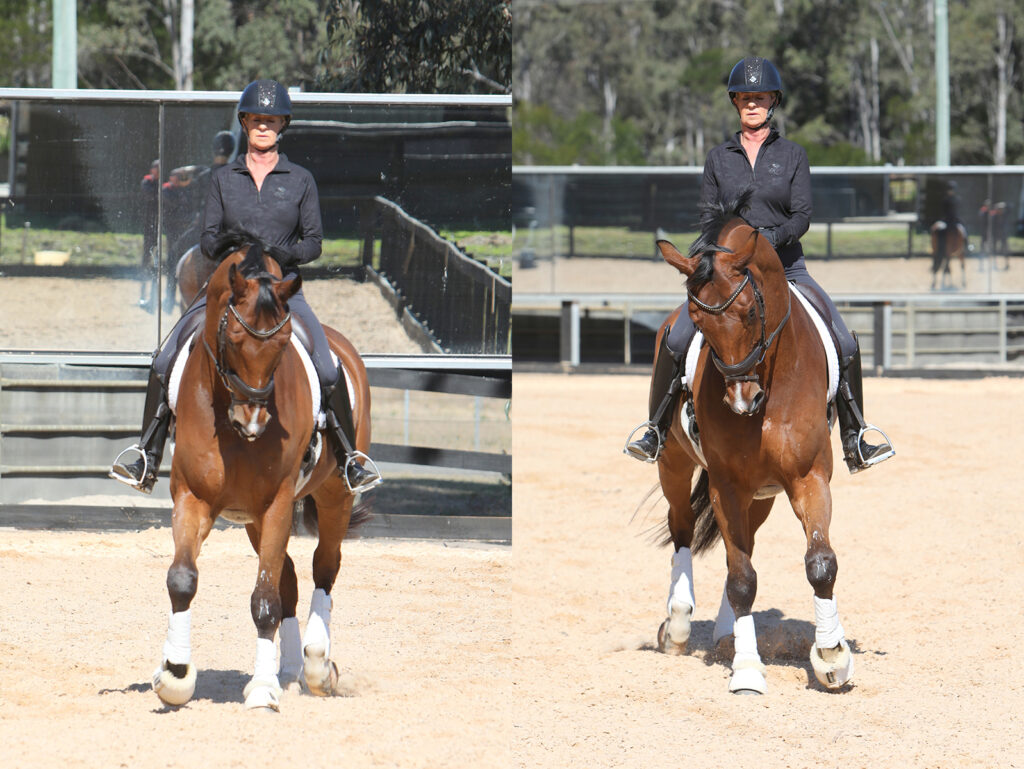
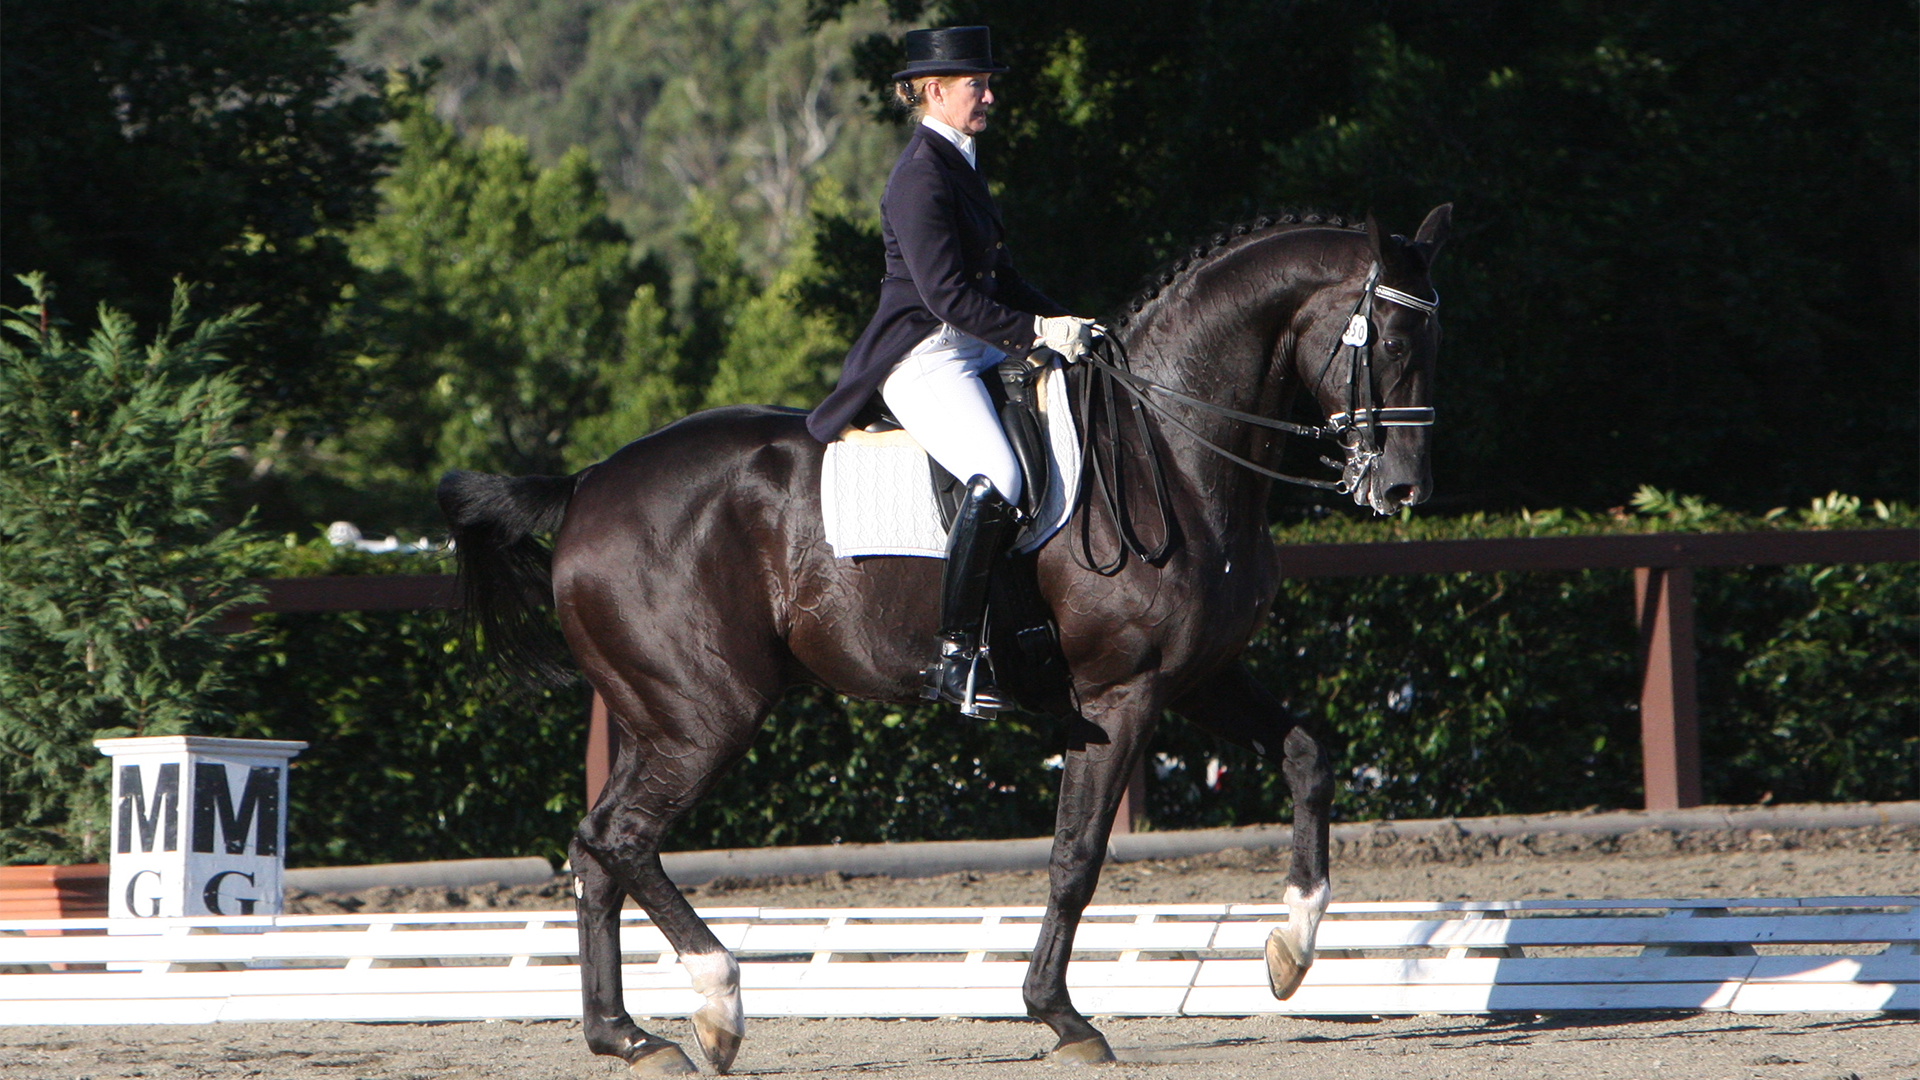
This photo is the culmination of all the exercises at home, and here is an outstanding Elementary horse competing in shoulder-in in a confident, uphill, forward thinking, balanced and engaged shoulder-in (fairly wonderful!). Image by Roger Fitzhardinge.
Catch up on Part 1 of Thinking Laterally here.
“At all times the horse must
remain forward-thinking.”
It is very important to realise that the constant and repetitive lateral exercises so far are all moving the horse away from the flexion and direction of the bend. It is very important to realise that it is positively the rider’s seat and leg that initiates the sideways movement, and at all times the horse must remain forward-thinking and in both reins with a comfortable contact; not strong and not non-existent.
This contact is a feel that varies as the horse develops carrying capacity and should become lighter as he becomes stronger by taking the weight over the hind end and lightening the forehand. Contact is also something that comes a little with the horse’s character, genetics and training. No matter what the exercise, the most important ingredient is keeping a forward thought — and that forward thinking, on behalf of the horse, is constant and is still very present when collection and any lateral movements are initiated. Once the horse learns to move off the inside leg, he must then learn to move off the outside leg. But first, the last of the exercises where the horse looks away from the direction of travel: the “shoulder-in”.
PREPARATION IS KEY
Now that your horse has a great grasp of moving away from the inside leg, it’s vital to teach him to also move away from the outside leg. This exercise will be helpful before the shoulder-in, as it’s a good idea to get the feeling you can connect one side to an outside rein then the other side to the opposing outside rein, and then you can get the connection to both reins and straight. Hey presto! “Off the forehand” is really an amazing thought to grasp! It’s about connecting the left ribs and shoulders into the outside rein, and then the right ribs and shoulders to the left rein; then you have worked out how to connect the two sides together, and lift the chest and withers! Remember the first vital step that is all-important is “forward” followed by “longitudinal submission”. A little interlude before the rigors of shoulder-in…. that’s a sentence and a half, but a great way to think of collection and connection!
The best way to start shoulder-in is in a counter change of hand from leg-yield left to leg-yield right. So, the change of direction in the sideways is initiated by the rider’s outside leg; this then becomes an understandable inside leg, and then you straighten and go back to the other direction.
Start on the 1/4 line and leg-yield to the wall. On the wall, flex to the wall and move back to the centreline, straighten and turn towards the flexed side. This is a great suppling exercise and will initiate the work towards the travers and the half-pass, and the walk and canter pirouettes. It’s at this moment of moving from left to right bending that, at that moment when they are straight, you have connected the two sides and the shoulders can be raised.
The shoulder-in is performed on three tracks, where the horse is bent around the rider’s inside leg so that the horse’s inside hind leg and outside foreleg travel on the same line. The angle of the horse to the wall is approximately 30 degrees. He looks away from the direction of the travel.
The best way to explain the positioning for the shoulder-in to start with, is that if you imagine a circle of 10 metres, ridden twice, and as the circle finishes you were taking frame by frame photos, as the first step of the second circle begins, then freeze that moment! This moment is the position for the shoulder-in, and then you simply take that position of your horse down the track, maintaining the flexion, bend, forward movement and angle. The exercise starts to improve the engagement and helps the horse to get better balance and learn to carry more weight on the inside hind as it steps well under the body… and that is under, towards the middle of the horse as well as forwards. It helps strengthen and stretch the rump and sacroiliac areas as well as the back.

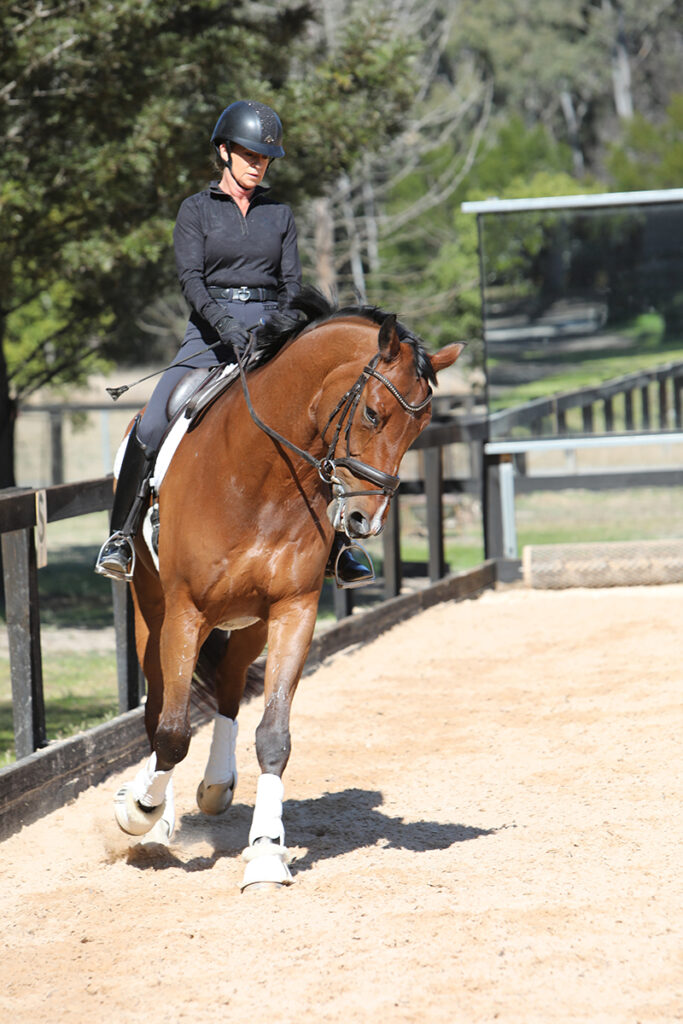
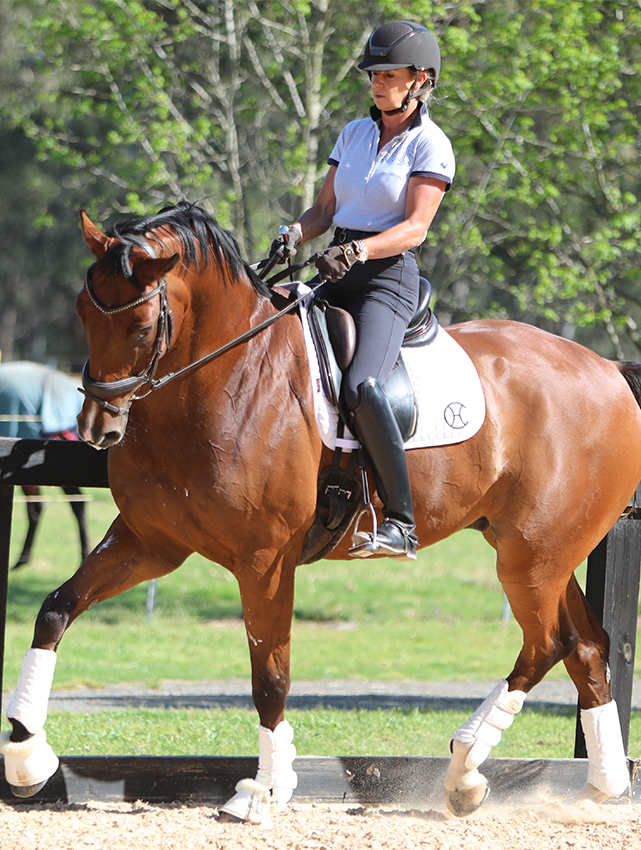
The first step off the track onto the circle, and it’s the moment to freeze and move down the track. The horse clearly here is on the circle. Image by Roger Fitzhardinge.
As has been discussed in the previous article, the quality of the movement is only a representation of the preparation. So it’s important to make certain that the horse understands the preparation for this movement. In the beginning the exercise is raw and it’s more like a leg-yield on an angle down a line or a long side, and is primarily about getting the inside hind leg to move away into a steady outside rein. A good way to simply get the horse to understand this is to start on a long side, even in walk, and then to bend and flex the horse to the outside, and with your outside leg push the quarters away from that outside leg. The rail will stop the shoulders from escaping and help initiate the right feeling. This is really “quarters-in” and is a raw exercise simply in forehand and quarters control.
As the word implies, it is a “shoulder-in”and not “quarters-out” as was explained in respect to the holding of the position as the horse’s shoulders step off the track. This exercise is only a preparation control exercise and is nothing like shoulder-in, but initiates a feeling. In the beginning after a few leg-yields to the long side attempting to move the quarters to the wall and then proceeding down the wall in this angled leg-yield affair, you can then come off a circle or corner and try riding simply down the long side a few times at an angle, as long as you have a very well established outside rein that doesn’t simply allow a flexed neck and a falling-out shoulder with no angle of the horse’s body to the wall.
It is always important to practice both sides equally and watch that the same bend (body) and flexion (referring to the neck) is present on both sides. The bend and flexion should be as you would have on the circle leading into the shoulder-in. Again, visualise that you are the eye from a drone above and that the bend and flexion as you step into that first step off the circle again is snapped and held and taken down the track with an outside rein maintaining the shoulder and the inside leg creating an active inside hind. The bend and flexion are maintained through the whole horse’s body and the rider has a feeling that the ribcage is soft, away from the inside leg and a feeling of sucking the rider into the saddle and a feeling of the inside leg being drawn into a hollow (not a stiff) pushing-out rib cage.
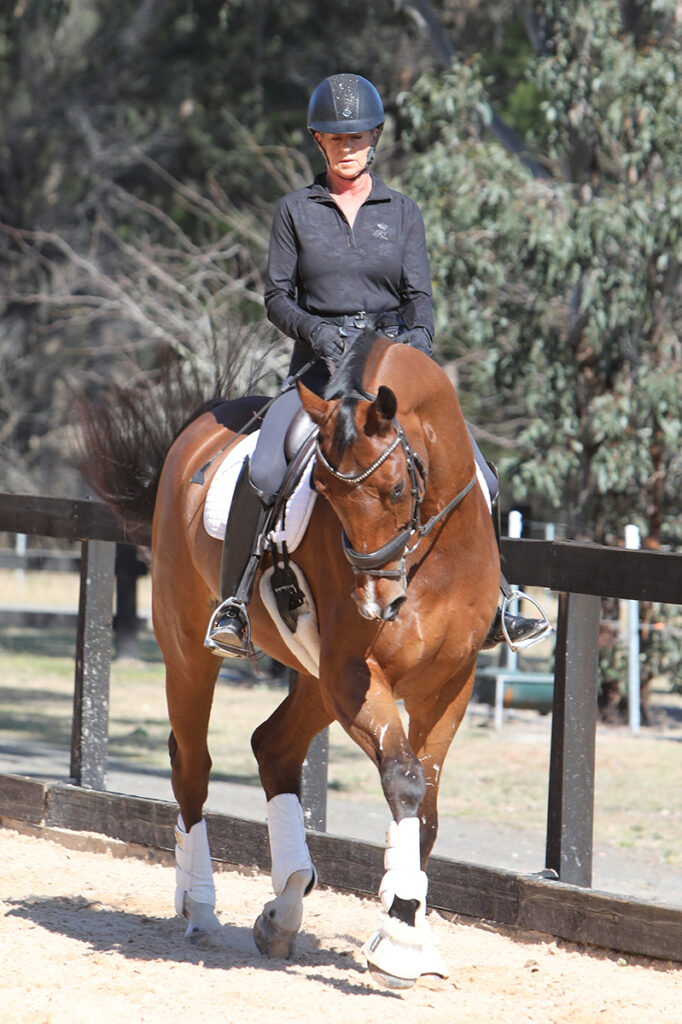
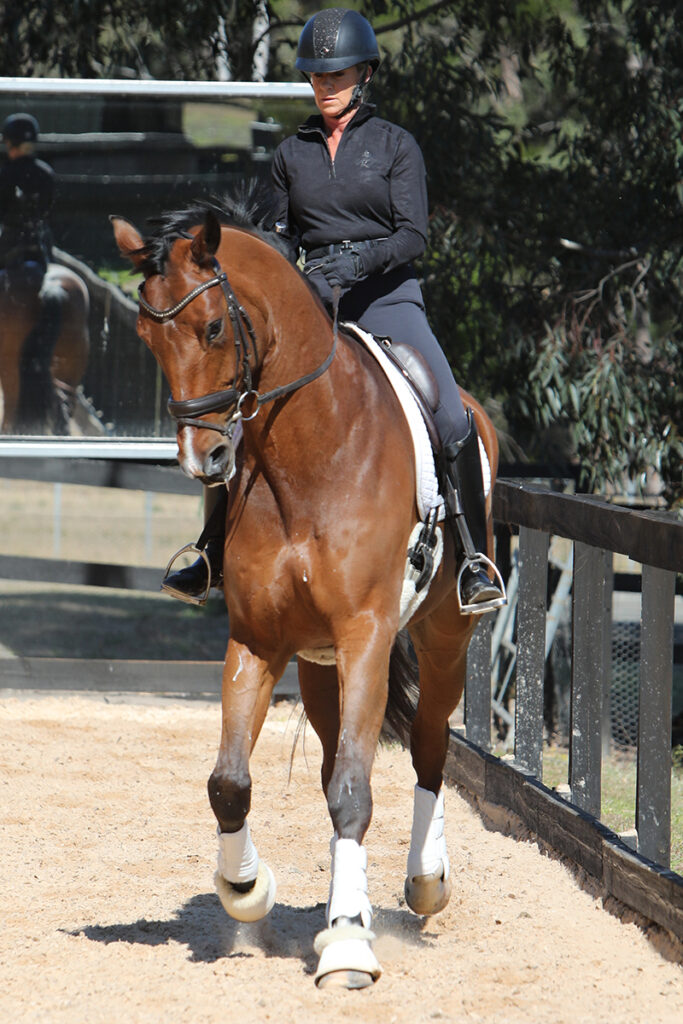
Neck flexion (no shoulder-in). Images by Roger Fitzhardinge.
“It is perfectly fine to
start the shoulder-in
in the walk…”
Imagine it’s the same feeling as a wave getting ready to break… it comes up and the weight of water moves away from the inside. This is the feeling of the wither and shoulder moving away and coming upward and sucking you into the inside.
RIDING THE SHOULDER-IN
So now that the horse and rider have an idea about moving towards the shoulder-in, a clearer explanation of the aids is needed. It’s worth noting here that it is perfectly fine to start the shoulder-in in the walk then progress to the trot, depending on the horse, the paces and the attitude, as sometimes trot is a more forward-thinking pace and easier to get a good rhythm and tempo. It is good to start in rising trot, when a better feeling for the tempo can be controlled, before doing it in sitting.
Always the horse must maintain the rhythm and forward desire, and it’s even more important to keep this as the horse goes sideways. There must be a feeling of throughness, and when you initiate any sideways desire your horse never wants to push through the contact and get hollow. Perhaps a little too round is more desirable than coming against the bridle and bracing and hollowing the back. A very common problem is the lack of control of the outside rein, and when riders just use their inside leg and inside rein then all you see is neck-bend and shoulders that are stuck falling out, and this is a serious fault.
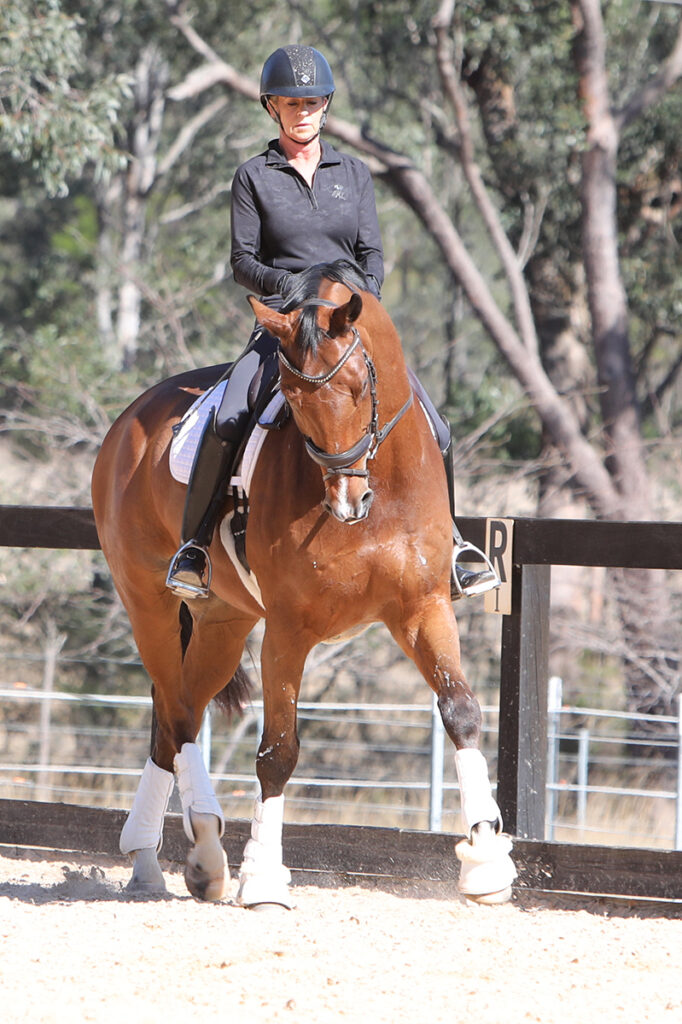
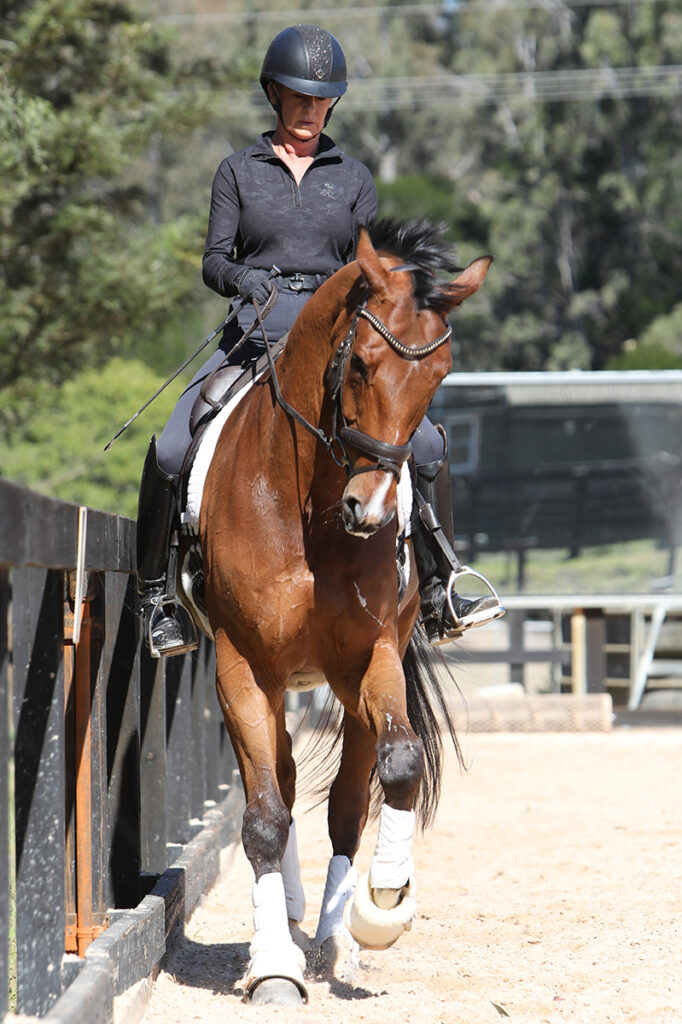
It has to be said that this is an excellent shoulder-in training moment, and as is explained it’s often better to see a little rounder outline in training for strength over the back rather than hollow. Images by Roger Fitzhardinge.
The aids for shoulder-in are simply the inside leg near the girth for the last few strides prior to the line to get your horse to realise something is coming up, and to keep the inside hind connecting to the outside rein and so keeping the bend through the body and spine. The outside leg is behind the girth in a neutral fashion to protect the outside hind leg from escaping out and then the inside rein keeps the flexion steady — and most important is that the outside rein controls the shoulder off the wall and then through the half-halt takes the horse in shoulder-in down the track. The rider’s eyes and body language should be focused in the direction the horse is going, i.e., down the track.
It is important at this stage to have someone on the ground to watch, or a mirror that when you look into it you should only see three tracks… or legs. These are the inside fore to the inside, the inside hind and outside fore in line, and the outside hind on the track. You will see three legs from the front; three tracks not four.
“It is a very hard movement
to ride correctly.”
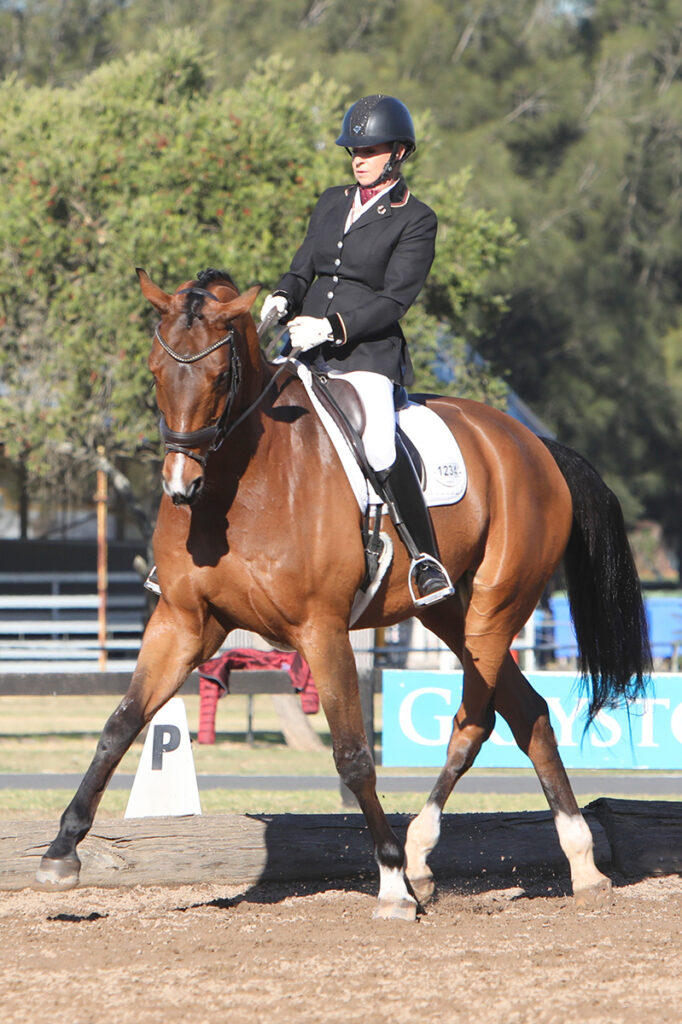
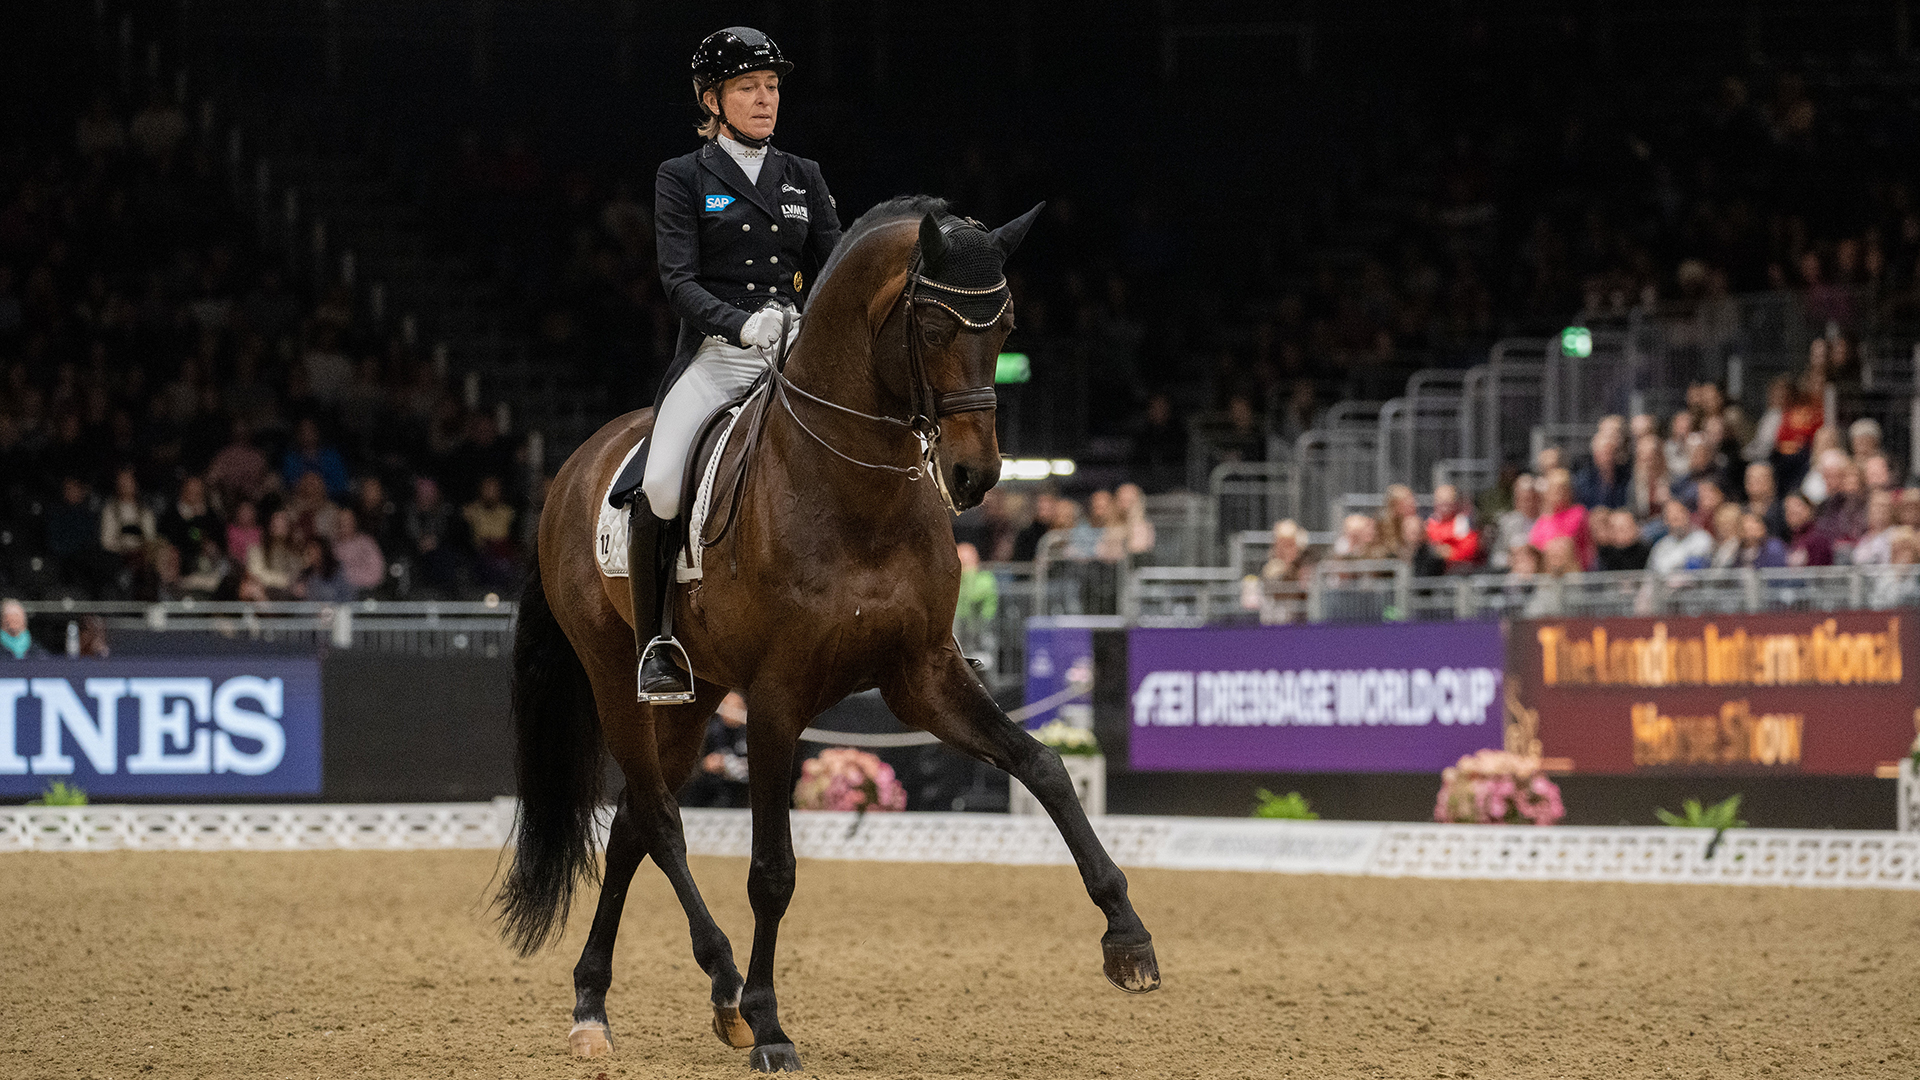
This is clearly three tracks as you can only see three legs. This is a very good three tracks for competition… it’s not a modest three tracks! Images by Roger Fitzhardinge.
At no stage in the shoulder-in should the hind legs cross over, as with the correct bend the hind legs go down the track. Again, think of the still photo of the first step onto the circle, and the hind legs go down the track, not crossing over. If they do it’s deemed leg-yield and will get a low mark in competition and will probably be on four tracks. It is important to say here that in a competition it’s probably best to think about having three-and-a-half tracks really, as otherwise the shoulder-in will appear modest and probably get a comment of not enough angle. A very important part of this exercise is to always straighten the horse at the end of the exercise by taking the forehand back to the track. This is not necessary if you are riding shoulder-in on to a circle as in the competition test, the shoulder-in is really the first step of the circle. But when training, it’s all-important to control the shoulders and so bringing them back to the track is essential, and then as with any lateral movement, always refresh the forwards desire.
BUILDING A BETTER HORSE
It is a very hard movement to ride correctly but it is so, so important as it is a preparatory position for so many movements… the half-pass… the pirouettes. It is an exercise that is used at all the levels from Elementary (really before this in training) through to Grand Prix, and is used not only as a suppling exercise but one to develop balance and engagement through a stronger way to use the hind legs to carry the weight and free the forehand.
The movement known as shoulder-fore is ridden the same as the shoulder-in but in a more modest angle bend and flexion, and is used as a straightening exercise on the long side. It basically is a balance and position exercise to keep and help the horse remaining straight and balanced.
The exercise can be done in walk as well and is a good exercise for any horse that gets slow hind legs in the collected and medium walk. So, with any horse that when you collect the walk becomes a little lateral, shoulder-fore/in will help hurry the hindlegs and help keep the walk steps pure. The shoulder-fore in walk is a good preparation for the walk pirouettes. The shoulder-in is done in trot, and in competition only in collected trot. The shoulder-fore can be useful in gaining straightness with a crooked horse and can be held in forward and collecting strides in the trot. It is a good idea to ride small transitions within the shoulder-in forwards and collecting to create energy and control.
This is a modest shoulder-fore in canter to protect the horse’s natural instinct to be quarters in! This is a straightening exercise. Images by Roger Fitzhardinge.
Shoulder-in can cautiously be used in canter as a straightening and balance/engagement exercise but caution here to take care of the purity of the canter steps, and the use of shoulder-fore is a better option. This positioning is what’s needed in the preparation and balancing prior to the canter half-pass (essential in the control and positioning for the zigzag) and the canter pirouettes.
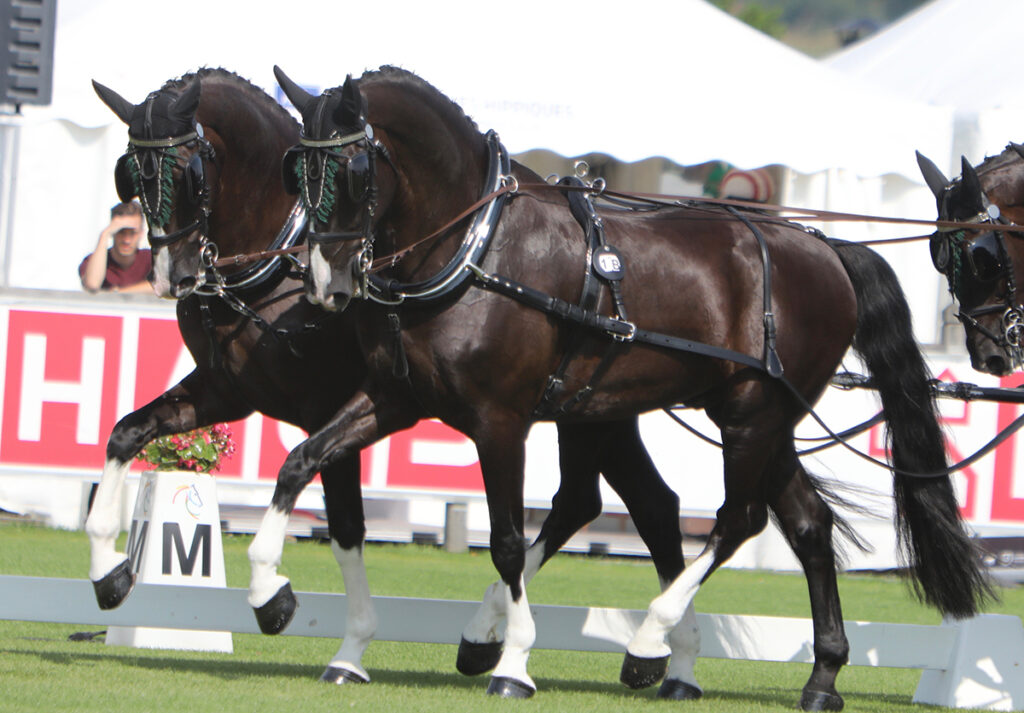
The shoulder-in is an exercise in shoulder control and engagement and is one of the most used tools on the road towards better dressage and stronger and more confident and balanced horses. What is so fantastic that even the four-in-hand driving horses have to show shoulder-in during the dressage phase.
“It is an exercise that is
used at all the levels.”
The final shoulder-in photo shows every perfect bend and flexion, the correct angle and the poll at the highest point with the horse’s inside hind truly engaged and carrying the weight. The pair is in wonderful self-carriage. There is no seat, no inside, outside legs. This is truly masterful and then to cap it off they are in unison. The man (Boyd Exell) is a genius! This is what you strive for in dressage horses and shoulder-in where the horses do it themselves in confidence and balance… take that!
Ride the wave of lateral submission! EQ
Related articles
Whatever the discipline – from campdrafting to dressage to polo or pleasure riding – having your horse obedient to moving away from your leg is of the utmost importance in improving control. Here is my approach to riding lateral work and where to begin (Part 1).
Of all the Grand Prix movements, passage may be one of the trickiest to learn for both horse and rider. Three top trainers discuss their methods, and all agree on one simple principle: it takes time.